Recovering Data from Samsung S2 Portable Hard Drive: A Comprehensive Guide
Three easy steps to recover data from S2 portable hard drive - Step 1: Launch the free version of Samsung Photo Recovery software on your computer and connect the hard drive to your PC. Step 2: Select the hard drive and click the Scan button. Step 3: The software scans the drive and recovers all your data, and after recovery is complete, it allows a free preview of the recovered files before saving. So, download the free software now, and start recovering your files!!!
![]()
![]()
![]()
![]()
The Samsung S2 portable hard drive is a compact and reliable storage solution for individuals and businesses alike. However, data loss can occur due to accidental deletion, formatting, hardware failure, or other unforeseen circumstances. When faced with data loss on your Samsung S2 portable hard drive, it's important to take immediate action to maximize the chances of successful data recovery. In this comprehensive guide, we will explore effective methods and steps to recover your valuable data from a Samsung S2 portable hard drive.
Stop Using The Drive:
As soon as you realize data loss on your Samsung S2 portable hard drive, it is crucial to discontinue any further usage of the drive. Continued use may overwrite the deleted or lost files, making recovery more challenging. By preventing any new data from being written to the drive, you increase the likelihood of recovering your data successfully.
Assess the Cause of Data Loss:
Understanding the cause of data loss is essential for determining the appropriate recovery method. It could be accidental deletion, formatting, virus/malware attacks, file system corruption, or physical damage. Identifying the cause will help you choose the most suitable approach for recovering data from your Samsung S2 portable hard drive.
Use Reliable Samsung Data Recovery Software to regain your lost data:
If the Samsung S2 portable hard drive is still recognized by your computer, software-based recovery methods can be effective. Several reliable data recovery software options are available online. AMong them, Samsung Data Recovery software is the most recommended one, as it is designed with user-friendly interface, and so even novice users also feel very easy to use the software.
More about Samsung Data Recovery Software
This application is capable to recover data from hard drives having file system HFS, NTFS, NTFS5 and FAT and exFAT and many more. It supports different types of file format such as image, audio, video and document. It retrieves data from a Samsung S2 portable external HDD without making any changes to the original file contents. Apart from Samsung S2 portable external hard drive recovery, you can even use this app to recover picture from Android-based Smartphone such as Samsung Galaxy and other popular brands of phones. Learn more about Samsung Galaxy photo recovery here.
Note: This awesome tool is capable to recover data from Samsung P3 portable 2TB external hard drive without spending too much time. To take a look at this tool’s working procedure go at: https://www.samsungphotorecovery.net/data-from-p3-portable-2tb-external-hard-drive.html
![]()
![]()
![]()
![]()
Steps to recover data from Samsung S2 portable external hard drive:
Step 1: Connect your Samsung S2 Portable hard drive to the computer. Download Samsung Photo Recovery software on your computer. Upon successful installation, launch the software & select the Samsung S2 external drive from the main screen and click the Scan button to start scanning.
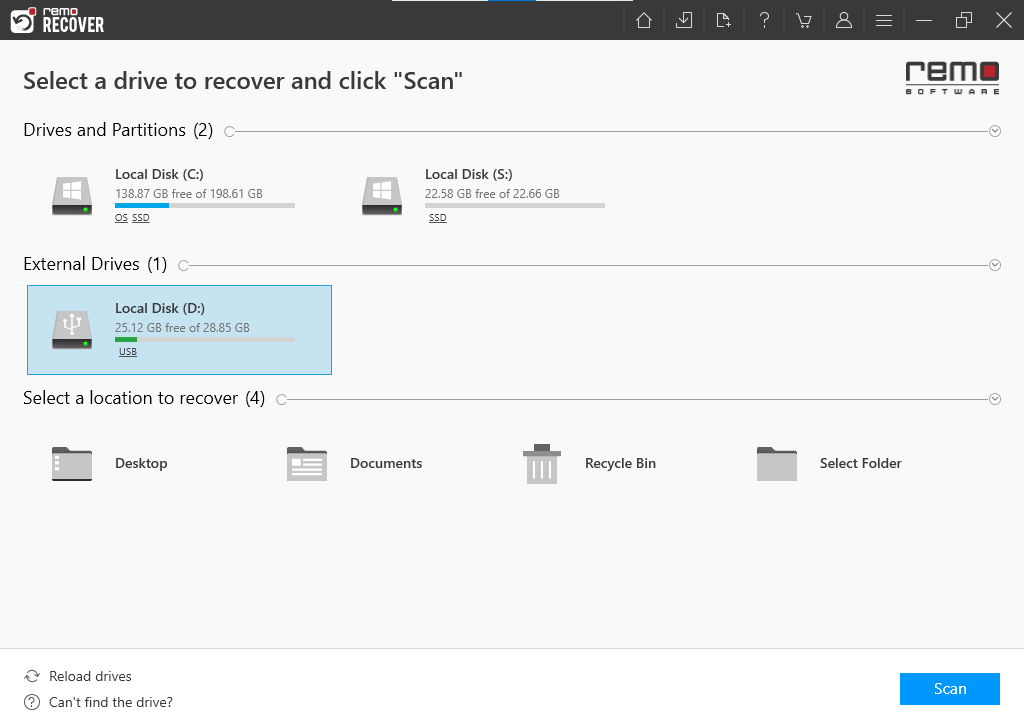
Note: If you unable to find your Samsung Device, click on the Can't Find the Drive option below
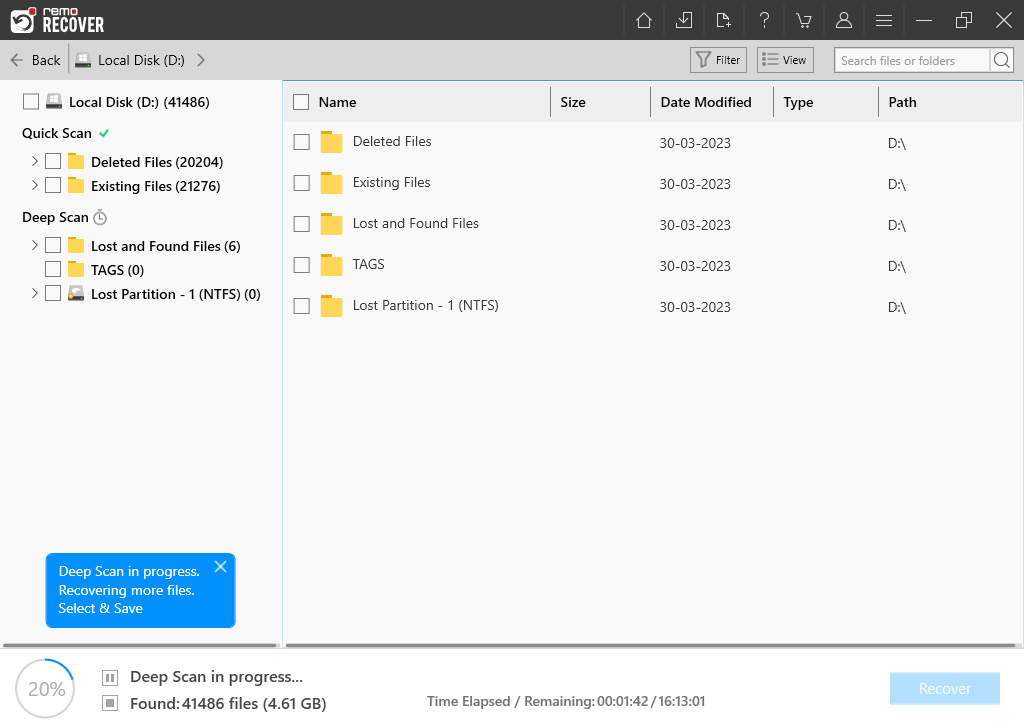
Step 2: During the scanning process, you can click on the Dynamic Recovery View option to locate photos and videos that are getting recovered by the software.
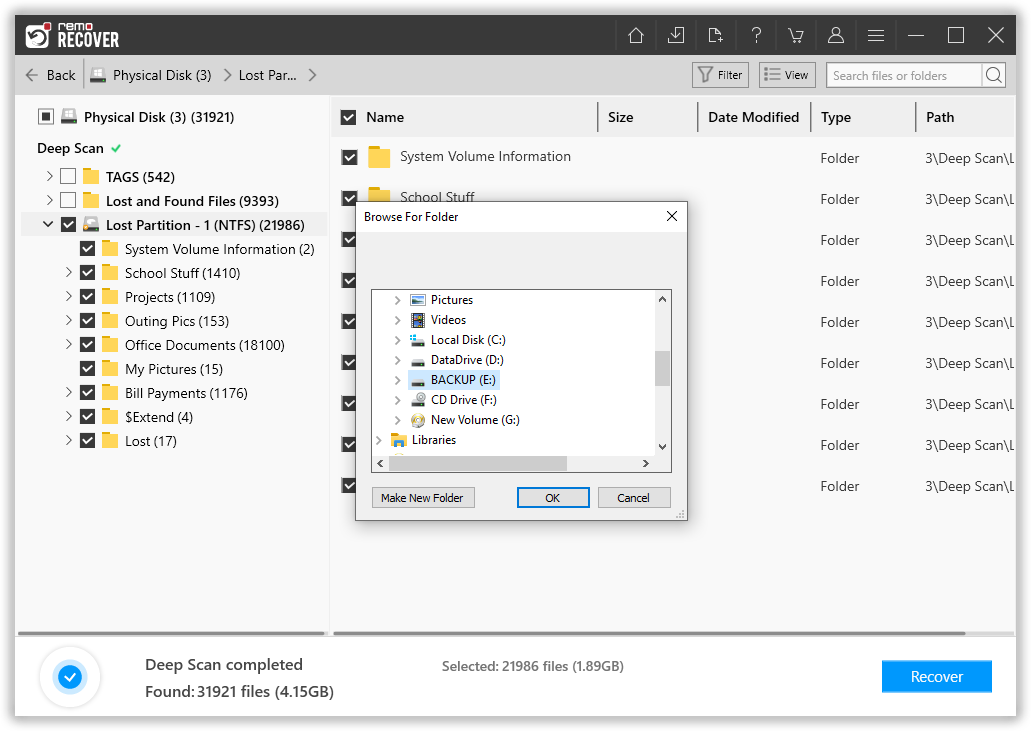
Step 3: Once the process is completed, this data recovery tool will display all the recovered files, photos, raw-images, and media files under the Lost Partition folder.
Step 4:You can preview recovered files by right-clicking on the particular file in the list.

Step 5:Proceed to save the restored files to a secure destination location.
![]()
![]()
![]()
![]()